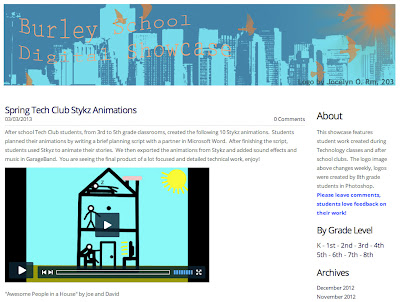
Although I have not shared anything new here since the start of school year, I have been busily updating and sharing a Digital Showcase which features my students' work from Tech Classes and after school Tech Clubs. Collecting student work has been incredibly easy for me ever since I realized I could search and copy from all 32 computers in my classroom at the same time using Remote Desktop.
Sunday, March 3, 2013
Sharing Student Work
It has been many months since I've taken the time to sit down and write a blog post, but the ICE Conference came and went (too quickly!) and has re-energized my thirst for both absorbing and sharing. In particular, I attended a spectacular breakout session led by Pernille Ripp all about blogging - - students blogging, teachers blogging, personal blogging. It was a heartfelt call to action and I know I wasn't the only one who left her sessions inspired.
Although I have not shared anything new here since the start of school year, I have been busily updating and sharing a Digital Showcase which features my students' work from Tech Classes and after school Tech Clubs. Collecting student work has been incredibly easy for me ever since I realized I could search and copy from all 32 computers in my classroom at the same time using Remote Desktop.
I added a link to the Burley School Digital Showcase in the right sidebar, please visit and feel free to provide feedback to my students! Though I am the one posting the work, they frequently look at the site and of course I direct them there as soon as their work receives feedback. I just added a fresh round of Stykz animation movies with full soundtracks created by my 3rd-5th grade after school Tech Club - check it out!
Although I have not shared anything new here since the start of school year, I have been busily updating and sharing a Digital Showcase which features my students' work from Tech Classes and after school Tech Clubs. Collecting student work has been incredibly easy for me ever since I realized I could search and copy from all 32 computers in my classroom at the same time using Remote Desktop.
Monday, July 30, 2012
Digital Animation with Stykz
There is no shortage of options for introducing digital animation to students, but hands down the favorite among my students, from 2nd to 8th grade, is Stykz. Stykz is created by Sons of Thunder Software, is completely free, and is available for Mac OS X or Windows.
Stykz is reminiscent of flip book drawings that most students are familiar with, where a stick figure is drawn on one page and then moves slightly on the next and so on. It seems like this familiarity with pencil and paper flip books is part of the reason students are so comfortable with the interface of what can be a fairly complex animation tool.


Hopefully, my explanation does not sound complicated, because the software truly is not. I have briefly introduced Stykz to 2nd, 3rd and 4th graders in an after school club, and the students quickly pick up on a variety of features and tricks through experimentation and sharing with their neighbors.
As with any software tool, there are endless YouTube tutorials on learning features beyond the basics. Here are a few I recommend:
- A four-part overview of the software, about 25 minutes all together. Part 1 – Part 2 – Part 3 – Part 4
- Explanation of how to download and install Droidz figures into Stykz
- Make your character run smoothly
Take a look below at a Stykz compilation from my students this past year:
Tuesday, July 3, 2012
Aspire Awards Medal Winners!
Back in April, five of my (now graduated) 8th grade students created a stop-motion animation film for Adobe Youth Voices titled "Gone". The film was entered into the 2012 Aspire Awards Film/Media Festival. Recently we found out the film was awarded the silver medal in the narrative category by panel of film professionals, quite an honor!
The students chose the topic of child soldiers in Africa for the piece. They collaboratively wrote the script, created storyboards, created the construction paper artwork, photographed and directed the stop-motion animation, edited the piece in Adobe Premiere Elements, and produced the soundtrack in Garageband. They amazed me with their creativity and work ethic throughout the process, and in particular I was blown away with the soundtrack they created, a very professional end result in my opinion.
"Thousands of children in Africa are abducted into war every year by corrupt soldier militias. These child soldiers are placed into extremely violent situations and girls are frequently abused and forced into unimaginably heinous acts. We felt we could most greatly help children forced into warfare by publicizing a story that has been repeated throughout the world far too many times. The intention for this piece is to educate other teenage children like ourselves as well as adults who may be unaware of these atrocities."
If you have not seen it, I hope you'll watch it now (below) and enjoy!
Saturday, June 30, 2012
Celebrating the school year with animation!
Another school year has come to a close and another group of amazing 8th grade students have moved onward to high school. In the months leading up to their graduation, these students absolutely amazed me with a variety of high-quality animation projects. I share these with you now (don't forget you can toggle them to full-screen), enjoy!
The animations included in the compilation above were created throughout the school year using a variety of methods and tools (stop-motion photography, Stykz, Keynote, and Animation-ish). I definitely plan to share lessons and instructional activities using these tools in the future, my students really enjoy creating with each of them.
The second animation (above) is purely stop-motion photography. This project took a lot of time, effort and planning by the students. Overall, about 2,000 digital photographs were used to create the 3-minute tour of our school building. As the students created the tour section by section, we reviewed the new additions before each subsequent photographing session. Those reviews provided the next group of students with inspiration and ideas to continue finding creative ways to conduct the tour.
The beauty of working on projects like this is that I will be able to share these fine examples with the next year of 8th grade students. I have no doubt they will build on the ideas and continue to be innovative youth media artists.
The animations included in the compilation above were created throughout the school year using a variety of methods and tools (stop-motion photography, Stykz, Keynote, and Animation-ish). I definitely plan to share lessons and instructional activities using these tools in the future, my students really enjoy creating with each of them.
The second animation (above) is purely stop-motion photography. This project took a lot of time, effort and planning by the students. Overall, about 2,000 digital photographs were used to create the 3-minute tour of our school building. As the students created the tour section by section, we reviewed the new additions before each subsequent photographing session. Those reviews provided the next group of students with inspiration and ideas to continue finding creative ways to conduct the tour.
The beauty of working on projects like this is that I will be able to share these fine examples with the next year of 8th grade students. I have no doubt they will build on the ideas and continue to be innovative youth media artists.
Saturday, March 24, 2012
Non-Fiction Features in Digital Painting
At the beginning of the school year, I introduce first
graders to the various ways of interacting with the mouse and keyboard by using
simple paint software. We currently
use Appleworks in our Media Center, but there are many updated and free paint programs
(Mac or Windows) that would work just as well.
Simply by using the paintbrush, drawing shapes, moving
objects, and adding words students are developing a variety of technical
skills. Some of the important computer
interface skills younger students develop with painting software include
clicking, clicking and dragging, double-clicking, and typing with the
keyboard. Once students become
proficient with the physical skills, it’s time to integrate these new technical
skills with relevant classroom content.
Throughout the year, 1st graders at my school learn about
features of written non-fiction pieces with their classroom teacher (on Twitter
and her blog). A few specific
non-fiction elements that translate very well into painting software are
diagrams with labels, attaching lines, and titles.
There are a few ways to go about the creation of the image
part of the diagram. I typically
have students start out by making a diagram out of clip art so they can focus
on adding text labels, lines connecting those labels to the appropriate areas,
and titles with appropriate size and typeface.
After students have experience making a diagram out of clip art, students are ready to make a diagram with an image they’ve created using the painting and drawing tools. I want them all to have at least 3 separate labels, but encourage them to add as many labels as they want. I am always incredibly impressed with their finished products!
Here’s a few samples (or you can view the whole classroom gallery at my school’s digital showcase):
Wednesday, March 14, 2012
Creating nameplates with 7th grade students
Following the introduction of Photoshop, 7th grade students are prepared to create a basic multi-layered image using the tools they’ve already seen as well as a few additional tools. The purpose of the image is to use as an account profile picture on our school’s social network, Edmodo. Students are represented by this picture (and their name) each time they write a new post or reply to another post.
Students first must create a new blank image file in
Photoshop. As long as the image is
square, it will work, but I generally have students start with an image 500
pixels wide by 500 pixels tall.
The background should be “Transparent” and the resolution will work fine
at 72 pixels per inch, which is generally the default choice.
Once in the blank file, I have students create a new layer
on top of the bottom transparent background. I also re-emphasize what I had told them before, that for
every new tool or color change, they should make a new layer first. The next step is to lay down a full
color layer, by either using the paint bucket or gradient tool. I quickly show them how the gradient
tool works (pretty similar to the paint bucket but with a blend of colors
rather than only one), and then move on to the brush.
Here’s a very valuable tip for anyone setting up Photoshop
for student use, download and install as many different brush styles as you’d
like at Brusheezy. The site is
entirely free and there are countless high-quality brush styles available
there. Students could peruse
Brusheezy on their own, but I found in past lessons that it ended up taking up
most of their work time, and also the brush files can be rather large so it can
put a strain on your network all at once.
So I recommend setting up a nice selection of brushes before students
ever sit down at Photoshop the very first time, clear and simple installation
instructions can be found over at Brusheezy.
Using the wide variety of brush styles, colors, and sizes,
students then create a nameplate design that they feel is suited to represent
them online. The brushes
themselves look more like a stamp when seen at first, but in Photoshop they
function just like any other brush style.
This step with the brushes has historically been highly enjoyed by my
students as there is an endless supply of options to choose from. Often students end up creating a couple
different versions and then ask classmates to help them decide before they
start designing the text of their name.
The final step of the nameplate creation process is adding a
name to the nameplate. This is
completed with the text tool in Photoshop. Similar to the brushes, I suggest a visit to FontSpace and
downloading a few extra appealing fonts.
At the time of posting, they have nearly 17,000 free fonts to
download. There has to be at least
a few desirable fonts for anyone in that batch! Here are all of the separate layers for one student’s
nameplate creation:
Monday, March 12, 2012
iPad photography with 5th grade students
Last week I had a very short technology class with 5th grade
students in their classroom. I debated how much we could accomplish with new
material in a grand total of 30 minutes on a day when students spent a
tremendous amount of energy on the Illinois Standards Achievement Test. Enter
the iPad.
In the next few weeks these 5th grade students are going to
be focusing on photography to accompany their writing with both their classroom
teacher as well as with me during Technology. The remarkable thing about having
only 30 minutes to introduce this very large topic with my students but doing
so with iPads, is that all 29 5th graders are sitting on the rug in front of me
with a camera, digital darkroom, and publishing suite resting on their laps!
I did not have to do much of an introduction for the camera
function on the iPad since they have used it frequently throughout the year.
However, there are a couple of keys to crisp photographs on any point-and-shoot
camera, and I’m putting the iPad in that category.
The first key is making sure your image is in focus. To
assure you have the desired focus using the iPad’s built-in camera app, all you
need to do is touch the area on the camera screen that you want as your focal
point. The iPad will then display a blue box around that area and attempt to
focus on it.
The second key to crisp photographs is reducing camera
shake. This is not an easy task with the iPad, which is rather large and
awkward for photography when compared with a camera. The strategy I gave to the
5th graders, was to make sure to hold the iPad with two hands in opposite
corners to reduce the amount of shake. Then make sure one hand is positioned so
that your thumb can stretch over to the “take photo” button on the screen. The
last part with the thumb will be somewhat alleviated when the iPads are updated
to iOS 5, in which case you can use the “volume up” button on the side to snap
a photo.
Now with the limited time we had, I gave students three
minutes to move about the classroom and take at least three photographs where
an inanimate object was the main focal point. I had them arrange their
compositions so that none of their classmates appeared in the photos, as the
inclusion of “each other” in the images ends up providing a large distraction
when sharing.
Students completed their photo-snapping, and I then gave
them an introduction to an app called Snapseed. Snapseed is a very easy-to-use
image manipulation app with a lot of pre-loaded effects and corrections. The
regular cost of the app is $4.99, but if you keep an eye on it (perhaps with AppShopper), you can download it for free when they temporarily put it on sale
as we did. Students used Snapseed to manipulate one or two of their chosen
photographs, and then saved them to their Camera Roll.
The last step in this 30-minute activity was sharing our
favorite photograph with classmates. This “publishing” step is made possible by
a recent update to the Edmodo app (updated February, 16th), where students can
now share saved iPad photos directly from within the Edmodo app. (To read more
about using Edmodo on the iPad, see this post by my colleague Katie!) Amazingly,
there were still a few minutes left of our short time for students to comment
on and provide feedback to each other via Edmodo. Here are some sample
photographs by students:
Subscribe to:
Posts (Atom)