One of my favorite instructional activities is introducing students to the world of visual manipulation in Adobe Photoshop. In the case of my 7th grade students, I am introducing them to Photoshop Elements, which is a lighter version of the full Photoshop when it comes to pricing and features. If you’re interested in this process but would prefer a free alternative to Photoshop or Photoshop Elements for Mac or Windows, see GIMP or GimpShop. For my purposes, the Elements version of Photoshop has all of the features I want to use with my students.
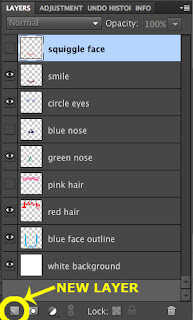
In my opinion the most complex hurdle to cross with students, or anyone for that matter, new to an advanced graphic editor like Photoshop is image layers. I find the easiest way to model exactly how layers work is with good old-fashioned overhead transparency paper. I take a small stack of transparencies and create a simple drawing of a face, but each element of the face is drawn on a separate sheet:
Using those transparencies, I can demonstrate that by manipulating the sheets or layers, it is easy to make a modification to a specific part of an image without affecting the other elements. This is regardless of what order the actions were completed, versus using the "Undo" command, which will only let you go back, step-by-step, in order. I emphasize to my students repeatedly that for every major change they make to an image, they need to make sure each change has its own layer. Here is a short video to demonstrate the layers:
Certainly layers are valuable for more reasons than just an advanced “undo” system, but I think this is an excellent entry point for new Photoshop users. After discussing the layers, we can move on to some of the tools in Photoshop that will feel quite familiar to anyone who has ever used any kind of painting software, the brush and the paint bucket. I demonstrate a few different ways to change the color of your current tool and also how to manipulate the brush size and brush style. Here is a video explaining the brush and paint bucket:
 The final step is to show how to add a new layer to an image, by clicking the “New Layer” button in the Layers panel (see image right), or CMD+SHFT+N on Mac and CNTRL+SHFT+N on Windows. It’s time for students to explore these tools, but I offer one last reminder before students begin, that with each change to a tool, make a new layer!
In the next post, I will explain how to use these introductory tools and a few others to create student nameplates that could serve as account profile images for the school social network.


No comments:
Post a Comment