Pages

Tuesday, March 26, 2013

Exploring with Google Earth through Children and their Toys


Estimated reading time according to Read-O-Meter: 2m36s

A few weeks ago I visited an amazing collection of photographs recommended by Jennie Magiera on Twitter.  The photographs were aesthetically stimulating and also provided an incredible amount of insight into the lives and experiences of others around the world from a variety of diverse locations.  Soon after that, Jennie wrote a blog post about sharing the images with her students and the subsequent conversation had on Schoology.

I was inspired myself and made plans to share the photos with my 4th graders the next day.  On a whim, I reached out to Jennie and we made plans to connect our students in a Google Hangout video chat to share our reflections together.  My students were extremely interested in the photographs and could hardly contain their excitement during our video chat.

So what are these photographs?

© Gabriele Galimberti
Italian photographer Gabriele Galimberti traveled around the world for 18 months and photographed children with their favorite toys.  He titled the series, "Toy Stories".  There are 34 different children (and locations) from five different continents.  The photographs not only give insight into what children around the world play with, but also something of the children themselves as you see the child in their play space.  Visit his site and see his Toy Stories collection.

After the first lesson, so many students wanted to know where these places were that they were seeing, so I went to Google Earth for help.  Following the tutorial videos from Google, I was able to create a .KMZ file with the images and placemarks embedded in the file (click here to download the .KMZ file, then open it in Google Earth).  When I saw my other 4th grade class the next week, the experience was dramatically different as they could not only browse through only the images, but they could browse the globe in Google Earth and click on the camera icon to see a child with their toys from that place.

Browsing the images in Google Earth
This allowed for two different conversations for my students, the images on their own versus the images on the map.  It was easy when using the map to compare and comment on images from the same region of the world.  Students had a variety of insights and reflections from taking in the images.  Most were surprised that children everywhere had toys like their own.  Many had a strong reaction to the variety of play spaces shown with each child.  The most talked about photographs by far were the few that show children surrounded with toy guns as their favorites.

I did the activity with all of my 4th and 5th grade classrooms and tried a few different methods for an accompanying online conversation:  Edmodo, TodaysMeet and Kidblog.  Each method had it’s own pluses and minuses, and in all honesty the conversations that happened verbally with neighbors were more intriguing as it was everyone’s sudden reaction rather than a planned out written thought.  But the online record provided an opportunity to hear from everyone for both myself as teacher and for all the other students.

Edmodo conversation about Toy Stories

TodaysMeet conversation about Toy Stories

Kidblog conversation about Toy Stories

Sunday, March 17, 2013

Purposeful graphic design with 7th graders


Estimated reading time according to Read-O-Meter: 3m19s

Finished poster painted in Photoshop by a 7th grade student

This year for Adobe Youth Voices (AYV) with my 50 seventh grade students I have focused a lot of technology instruction on Photoshop and a few relevant graphic design techniques using that software.  This was a very lengthy process for me and my students, but I believe they gained a lot valuable technical and design knowledge while I learned many lessons in project management for this number of students.

After a handful of technical lessons with the software, we dug into the AYV program by looking at successful projects from past years.  A successful AYV project is one that has a clear message, an intended audience, expresses youth voice, and showcases creativity and innovation with the software.

View some of last year's award winners

Next I wanted to help students find an issue or cause that they were particularly concerned with.  For some students, this is simple and apparent while others benefit from guidance and suggestions.  I had students do some private free writing and then go through and highlight words or thoughts that stood out to them as important.  Students then filled out an anonymous Google Form where I asked them three questions:

  • What topics are you concerned about in the world?
  • What are you passionate about?
  • What are you worried about or what pressures are you facing?

Having that questionnaire be anonymous greatly helped me discover what themes or trends they were really engaged with; and three trends emerged:  friends/cliques, bullying, and getting into their chosen high school.  As a specials teacher, I only see my students one time each week and it is challenging to develop the kind of trust needed to openly speak with ALL students about their personal life concerns – so an anonymous Google Form was extremely helpful.

After students decided a topic, they began planning the design for an 11”x17” poster on their chosen message.  Some students worked purely with brushes and text to create an original design and message, some found Creative Commons-licensed images and manipulated them in Photoshop to remix as their own, and some took original photographs to use in the creation of their poster.

A Creative-Commons photograph remixed in Photoshop by a 7th grade student

After a few classes of working with images, I showed them Karen Kavett videos about typography to get them thinking deeper about the typefaces they ultimately choose.  At the end of every class students shared in small table groups their creations and changes in order to give and receive feedback.  It took a bit longer than I had planned, but all students eventually wrapped up the design and creation of their original poster.

After everyone was finished, myself and another teacher selected 12 posters from the group of 50 that we thought should be submitted to this year’s Aspire Awards.  Those posters, though “turned in”, now needed a lot of fixing of details both big and small, as well as written artist statements.  That is where we currently are in the process, I am working with 12 students after school to refine and write.

Revisions of a student's poster (original at top, finished at bottom)

I learned valuable lessons from this experience that I will definitely apply to similar situations in the future.  The first is that when doing 50 different projects that are artistic and technical, it is vital to include peer feedback consistently throughout the process.  This saved time and students became skillful at it once we began practicing a quick critique at the end of class.  The second is that although it was wonderful to tell students they could create anything they wanted, in practice it ruined some students’ ideas from the start.  I should have seen that some ideas were too ambitious for the time we have and in the future I will give more guidelines as to what specifically can be accomplished in the amount of time we have during tech classes.

I can’t wait to share their finished posters in the next few weeks and wish them the best of luck in the Aspire Awards!

Sunday, March 10, 2013

Use a camera in your classroom everyday!


Estimated reading time according to Read-O-Meter: 4m23s

CC-BY-SA-2.5 Nicolás García
Cameras continue to become increasingly ubiquitous in 21st century life.  They exist in a variety of forms and formats, but they can be found everywhere.  Traditional formats still exist in digital point-and-shoots and DSLRs, but cameras are much more present in our daily lives as a feature on tablets, MP3 players, portable video games and mobile phones.

So what?  Well as camera technology has infused our daily lives, so too should it be infusing your classroom on a daily basis!  Using cameras in the classroom is certainly not new, but with the emergence of cameras that are more accessible and services that make sharing or archiving simpler, I encourage you to reassess how often a camera is put to use in your classroom, and below you will find a few suggestions.

Archiving
If you have a tablet or phone with a camera, these items are probably never too far out of reach throughout the school day.  These ever-present cameras are extremely handy for archiving a variety of classroom items:  anchor charts, bulletin boards, your neatly organized classroom library, handouts from professional development, paper schedules, and student work done on paper to name only a few.

Pointing your camera at a piece of paper might feel unusual at first, but even the relatively low-quality camera on the back of an iPad 2 captures the details well enough to reference later.  Personally, I use my phone for this purpose.  The beauty of having documents (which were either created on paper or delivered only on paper) all “scanned” on my phone is that I always have access to them wherever I might be working.

Student Portfolios
Digital portfolios are becoming increasingly common, Evernote being one tool educators are using to have students freely and easily maintain a portfolio (or, explained in video).  If you are a 1:1 device classroom, the cameras on a tablet, laptop or Chromebook not only allow your students to snap a photograph of their paper work, but they also can sit in their device’s “photo booth” and record a video explaining their thinking or offering reflections.

Photography as Art
A camera in the hands of your students opens up an entirely different form of creative expression through photography.  In my own experience, I have found photography to be an excellent way for all students to become engaged in artistic expression and starting to consider elements of visual literacy.  Students, and people in general, tend to lump themselves into groups like, “I can’t draw” or, “I don’t sing.”  Hand them a camera though and teach them a few composition guidelines and suddenly you have 30 little Ansel Adams’ in your midst.  Here is some excellent photography work done by my students, which I generally teach as a unit in 2nd, 5th and 7th grades.

Family Connection
As teachers, we all have heard from parents that when they ask their child what they did at school today, they receive a vague response like, “Stuff” or, “Different things.”  Generally in the past teachers have been able to share classroom photographs by taking the time to connect a digital camera to a computer, transfer the photos, pick out the ones worth sharing, then upload them to a classroom webpage.

Enter ShutterCal.  ShutterCal is an online daily photo calendar and is one of many solutions to the time-consuming ways of the past.  It is totally free, although it does offer advanced privacy features for a small fee.  ShutterCal can be used from a computer, but the true time saver is if you have an iOS device in your classroom with the free ShutterCal app.  In less than a minute, you can easily share a daily photo to your ShutterCal calendar and have it automatically displayed on your classroom homepage as well – without ever touching a computer or taking out any cords.  If you are truly brilliant, like my colleague Katie Muhtaris, you could create a class job for a student to snap the daily photo and upload it from their iPad.

Things to Consider
If you have any intention of the photographs you snap of your students or of their work being shared beyond your classroom walls, be sure you are in compliance with school and district policies.  In my case, there are district policies in place and at our school we send home a media release form to every student at the beginning of the school year.  I keep a list handy of students whose families have declined consent or have not returned the form and I do not share any photographs or work of those students publicly online.

A Good Classroom Camera
Beyond the tablets or phones you or your students have in your classroom, a dedicated digital camera is still an excellent tool to have available.  I would like to explain all of this in more detail in a future post, but basically I believe a good classroom camera should be able to take decent photographs, record acceptable videos, and have macro photography capability.  Cost is always an issue, so one option I’d suggest is the Canon Powershot A1200 which fits all three points above and at the time of posting costs only $90.

Questions or suggestions on other classroom camera connections, please share them in the comments!  Now, go forth and photograph!

Sunday, March 3, 2013

Sharing Student Work

It has been many months since I've taken the time to sit down and write a blog post, but the ICE Conference came and went (too quickly!) and has re-energized my thirst for both absorbing and sharing.  In particular, I attended a spectacular breakout session led by Pernille Ripp all about blogging - - students blogging, teachers blogging, personal blogging.  It was a heartfelt call to action and I know I wasn't the only one who left her sessions inspired.

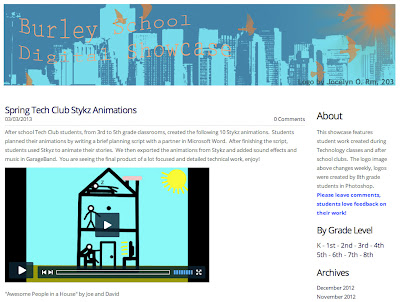
Although I have not shared anything new here since the start of school year, I have been busily updating and sharing a Digital Showcase which features my students' work from Tech Classes and after school Tech Clubs. Collecting student work has been incredibly easy for me ever since I realized I could search and copy from all 32 computers in my classroom at the same time using Remote Desktop.

Burley School Digital Showcase

I added a link to the Burley School Digital Showcase in the right sidebar, please visit and feel free to provide feedback to my students!  Though I am the one posting the work, they frequently look at the site and of course I direct them there as soon as their work receives feedback.  I just added a fresh round of Stykz animation movies with full soundtracks created by my 3rd-5th grade after school Tech Club - check it out!