Pages

Showing posts with label Photography. Show all posts

Sunday, March 10, 2013

Use a camera in your classroom everyday!


Estimated reading time according to Read-O-Meter: 4m23s

CC-BY-SA-2.5 Nicolás García
Cameras continue to become increasingly ubiquitous in 21st century life.  They exist in a variety of forms and formats, but they can be found everywhere.  Traditional formats still exist in digital point-and-shoots and DSLRs, but cameras are much more present in our daily lives as a feature on tablets, MP3 players, portable video games and mobile phones.

So what?  Well as camera technology has infused our daily lives, so too should it be infusing your classroom on a daily basis!  Using cameras in the classroom is certainly not new, but with the emergence of cameras that are more accessible and services that make sharing or archiving simpler, I encourage you to reassess how often a camera is put to use in your classroom, and below you will find a few suggestions.

Archiving
If you have a tablet or phone with a camera, these items are probably never too far out of reach throughout the school day.  These ever-present cameras are extremely handy for archiving a variety of classroom items:  anchor charts, bulletin boards, your neatly organized classroom library, handouts from professional development, paper schedules, and student work done on paper to name only a few.

Pointing your camera at a piece of paper might feel unusual at first, but even the relatively low-quality camera on the back of an iPad 2 captures the details well enough to reference later.  Personally, I use my phone for this purpose.  The beauty of having documents (which were either created on paper or delivered only on paper) all “scanned” on my phone is that I always have access to them wherever I might be working.

Student Portfolios
Digital portfolios are becoming increasingly common, Evernote being one tool educators are using to have students freely and easily maintain a portfolio (or, explained in video).  If you are a 1:1 device classroom, the cameras on a tablet, laptop or Chromebook not only allow your students to snap a photograph of their paper work, but they also can sit in their device’s “photo booth” and record a video explaining their thinking or offering reflections.

Photography as Art
A camera in the hands of your students opens up an entirely different form of creative expression through photography.  In my own experience, I have found photography to be an excellent way for all students to become engaged in artistic expression and starting to consider elements of visual literacy.  Students, and people in general, tend to lump themselves into groups like, “I can’t draw” or, “I don’t sing.”  Hand them a camera though and teach them a few composition guidelines and suddenly you have 30 little Ansel Adams’ in your midst.  Here is some excellent photography work done by my students, which I generally teach as a unit in 2nd, 5th and 7th grades.

Family Connection
As teachers, we all have heard from parents that when they ask their child what they did at school today, they receive a vague response like, “Stuff” or, “Different things.”  Generally in the past teachers have been able to share classroom photographs by taking the time to connect a digital camera to a computer, transfer the photos, pick out the ones worth sharing, then upload them to a classroom webpage.

Enter ShutterCal.  ShutterCal is an online daily photo calendar and is one of many solutions to the time-consuming ways of the past.  It is totally free, although it does offer advanced privacy features for a small fee.  ShutterCal can be used from a computer, but the true time saver is if you have an iOS device in your classroom with the free ShutterCal app.  In less than a minute, you can easily share a daily photo to your ShutterCal calendar and have it automatically displayed on your classroom homepage as well – without ever touching a computer or taking out any cords.  If you are truly brilliant, like my colleague Katie Muhtaris, you could create a class job for a student to snap the daily photo and upload it from their iPad.

Things to Consider
If you have any intention of the photographs you snap of your students or of their work being shared beyond your classroom walls, be sure you are in compliance with school and district policies.  In my case, there are district policies in place and at our school we send home a media release form to every student at the beginning of the school year.  I keep a list handy of students whose families have declined consent or have not returned the form and I do not share any photographs or work of those students publicly online.

A Good Classroom Camera
Beyond the tablets or phones you or your students have in your classroom, a dedicated digital camera is still an excellent tool to have available.  I would like to explain all of this in more detail in a future post, but basically I believe a good classroom camera should be able to take decent photographs, record acceptable videos, and have macro photography capability.  Cost is always an issue, so one option I’d suggest is the Canon Powershot A1200 which fits all three points above and at the time of posting costs only $90.

Questions or suggestions on other classroom camera connections, please share them in the comments!  Now, go forth and photograph!

Wednesday, March 14, 2012

Creating nameplates with 7th grade students


Following the introduction of Photoshop, 7th grade students are prepared to create a basic multi-layered image using the tools they’ve already seen as well as a few additional tools.  The purpose of the image is to use as an account profile picture on our school’s social network, Edmodo.  Students are represented by this picture (and their name) each time they write a new post or reply to another post.

Students first must create a new blank image file in Photoshop.  As long as the image is square, it will work, but I generally have students start with an image 500 pixels wide by 500 pixels tall.  The background should be “Transparent” and the resolution will work fine at 72 pixels per inch, which is generally the default choice.

Once in the blank file, I have students create a new layer on top of the bottom transparent background.  I also re-emphasize what I had told them before, that for every new tool or color change, they should make a new layer first.  The next step is to lay down a full color layer, by either using the paint bucket or gradient tool.  I quickly show them how the gradient tool works (pretty similar to the paint bucket but with a blend of colors rather than only one), and then move on to the brush.

Here’s a very valuable tip for anyone setting up Photoshop for student use, download and install as many different brush styles as you’d like at Brusheezy.  The site is entirely free and there are countless high-quality brush styles available there.  Students could peruse Brusheezy on their own, but I found in past lessons that it ended up taking up most of their work time, and also the brush files can be rather large so it can put a strain on your network all at once.  So I recommend setting up a nice selection of brushes before students ever sit down at Photoshop the very first time, clear and simple installation instructions can be found over at Brusheezy.

Using the wide variety of brush styles, colors, and sizes, students then create a nameplate design that they feel is suited to represent them online.  The brushes themselves look more like a stamp when seen at first, but in Photoshop they function just like any other brush style.  This step with the brushes has historically been highly enjoyed by my students as there is an endless supply of options to choose from.  Often students end up creating a couple different versions and then ask classmates to help them decide before they start designing the text of their name.

The final step of the nameplate creation process is adding a name to the nameplate.  This is completed with the text tool in Photoshop.  Similar to the brushes, I suggest a visit to FontSpace and downloading a few extra appealing fonts.  At the time of posting, they have nearly 17,000 free fonts to download.  There has to be at least a few desirable fonts for anyone in that batch!  Here are all of the separate layers for one student’s nameplate creation:


After the nameplate is complete, students use Photoshop’s “Save for Web” feature (found in the File menu) to reduce the size of the file and save it as a .JPG in order to upload it to their account profile.  Here are some more examples created by my students (with the names changed):

Monday, March 12, 2012

iPad photography with 5th grade students


Last week I had a very short technology class with 5th grade students in their classroom. I debated how much we could accomplish with new material in a grand total of 30 minutes on a day when students spent a tremendous amount of energy on the Illinois Standards Achievement Test. Enter the iPad.

In the next few weeks these 5th grade students are going to be focusing on photography to accompany their writing with both their classroom teacher as well as with me during Technology. The remarkable thing about having only 30 minutes to introduce this very large topic with my students but doing so with iPads, is that all 29 5th graders are sitting on the rug in front of me with a camera, digital darkroom, and publishing suite resting on their laps!


I did not have to do much of an introduction for the camera function on the iPad since they have used it frequently throughout the year. However, there are a couple of keys to crisp photographs on any point-and-shoot camera, and I’m putting the iPad in that category.

The first key is making sure your image is in focus. To assure you have the desired focus using the iPad’s built-in camera app, all you need to do is touch the area on the camera screen that you want as your focal point. The iPad will then display a blue box around that area and attempt to focus on it.

The second key to crisp photographs is reducing camera shake. This is not an easy task with the iPad, which is rather large and awkward for photography when compared with a camera. The strategy I gave to the 5th graders, was to make sure to hold the iPad with two hands in opposite corners to reduce the amount of shake. Then make sure one hand is positioned so that your thumb can stretch over to the “take photo” button on the screen. The last part with the thumb will be somewhat alleviated when the iPads are updated to iOS 5, in which case you can use the “volume up” button on the side to snap a photo.

Now with the limited time we had, I gave students three minutes to move about the classroom and take at least three photographs where an inanimate object was the main focal point. I had them arrange their compositions so that none of their classmates appeared in the photos, as the inclusion of “each other” in the images ends up providing a large distraction when sharing.

Students completed their photo-snapping, and I then gave them an introduction to an app called Snapseed. Snapseed is a very easy-to-use image manipulation app with a lot of pre-loaded effects and corrections. The regular cost of the app is $4.99, but if you keep an eye on it (perhaps with AppShopper), you can download it for free when they temporarily put it on sale as we did. Students used Snapseed to manipulate one or two of their chosen photographs, and then saved them to their Camera Roll.

The last step in this 30-minute activity was sharing our favorite photograph with classmates. This “publishing” step is made possible by a recent update to the Edmodo app (updated February, 16th), where students can now share saved iPad photos directly from within the Edmodo app. (To read more about using Edmodo on the iPad, see this post by my colleague Katie!) Amazingly, there were still a few minutes left of our short time for students to comment on and provide feedback to each other via Edmodo. Here are some sample photographs by students:


Tuesday, March 6, 2012

Introducing Photoshop to 7th Grade Students


One of my favorite instructional activities is introducing students to the world of visual manipulation in Adobe Photoshop. In the case of my 7th grade students, I am introducing them to Photoshop Elements, which is a lighter version of the full Photoshop when it comes to pricing and features. If you’re interested in this process but would prefer a free alternative to Photoshop or Photoshop Elements for Mac or Windows, see GIMP or GimpShop. For my purposes, the Elements version of Photoshop has all of the features I want to use with my students.

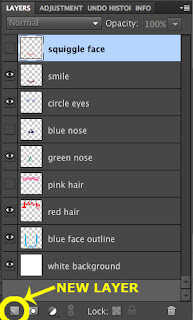
In my opinion the most complex hurdle to cross with students, or anyone for that matter, new to an advanced graphic editor like Photoshop is image layers. I find the easiest way to model exactly how layers work is with good old-fashioned overhead transparency paper. I take a small stack of transparencies and create a simple drawing of a face, but each element of the face is drawn on a separate sheet:

Using those transparencies, I can demonstrate that by manipulating the sheets or layers, it is easy to make a modification to a specific part of an image without affecting the other elements. This is regardless of what order the actions were completed, versus using the "Undo" command, which will only let you go back, step-by-step, in order. I emphasize to my students repeatedly that for every major change they make to an image, they need to make sure each change has its own layer. Here is a short video to demonstrate the layers:


Certainly layers are valuable for more reasons than just an advanced “undo” system, but I think this is an excellent entry point for new Photoshop users. After discussing the layers, we can move on to some of the tools in Photoshop that will feel quite familiar to anyone who has ever used any kind of painting software, the brush and the paint bucket. I demonstrate a few different ways to change the color of your current tool and also how to manipulate the brush size and brush style. Here is a video explaining the brush and paint bucket:


The final step is to show how to add a new layer to an image, by clicking the “New Layer” button in the Layers panel (see image right), or CMD+SHFT+N on Mac and CNTRL+SHFT+N on Windows. It’s time for students to explore these tools, but I offer one last reminder before students begin, that with each change to a tool, make a new layer!

In the next post, I will explain how to use these introductory tools and a few others to create student nameplates that could serve as account profile images for the school social network.