Pages

Showing posts with label Photoshop. Show all posts

Sunday, March 17, 2013

Purposeful graphic design with 7th graders


Estimated reading time according to Read-O-Meter: 3m19s

Finished poster painted in Photoshop by a 7th grade student

This year for Adobe Youth Voices (AYV) with my 50 seventh grade students I have focused a lot of technology instruction on Photoshop and a few relevant graphic design techniques using that software.  This was a very lengthy process for me and my students, but I believe they gained a lot valuable technical and design knowledge while I learned many lessons in project management for this number of students.

After a handful of technical lessons with the software, we dug into the AYV program by looking at successful projects from past years.  A successful AYV project is one that has a clear message, an intended audience, expresses youth voice, and showcases creativity and innovation with the software.

View some of last year's award winners

Next I wanted to help students find an issue or cause that they were particularly concerned with.  For some students, this is simple and apparent while others benefit from guidance and suggestions.  I had students do some private free writing and then go through and highlight words or thoughts that stood out to them as important.  Students then filled out an anonymous Google Form where I asked them three questions:

  • What topics are you concerned about in the world?
  • What are you passionate about?
  • What are you worried about or what pressures are you facing?

Having that questionnaire be anonymous greatly helped me discover what themes or trends they were really engaged with; and three trends emerged:  friends/cliques, bullying, and getting into their chosen high school.  As a specials teacher, I only see my students one time each week and it is challenging to develop the kind of trust needed to openly speak with ALL students about their personal life concerns – so an anonymous Google Form was extremely helpful.

After students decided a topic, they began planning the design for an 11”x17” poster on their chosen message.  Some students worked purely with brushes and text to create an original design and message, some found Creative Commons-licensed images and manipulated them in Photoshop to remix as their own, and some took original photographs to use in the creation of their poster.

A Creative-Commons photograph remixed in Photoshop by a 7th grade student

After a few classes of working with images, I showed them Karen Kavett videos about typography to get them thinking deeper about the typefaces they ultimately choose.  At the end of every class students shared in small table groups their creations and changes in order to give and receive feedback.  It took a bit longer than I had planned, but all students eventually wrapped up the design and creation of their original poster.

After everyone was finished, myself and another teacher selected 12 posters from the group of 50 that we thought should be submitted to this year’s Aspire Awards.  Those posters, though “turned in”, now needed a lot of fixing of details both big and small, as well as written artist statements.  That is where we currently are in the process, I am working with 12 students after school to refine and write.

Revisions of a student's poster (original at top, finished at bottom)

I learned valuable lessons from this experience that I will definitely apply to similar situations in the future.  The first is that when doing 50 different projects that are artistic and technical, it is vital to include peer feedback consistently throughout the process.  This saved time and students became skillful at it once we began practicing a quick critique at the end of class.  The second is that although it was wonderful to tell students they could create anything they wanted, in practice it ruined some students’ ideas from the start.  I should have seen that some ideas were too ambitious for the time we have and in the future I will give more guidelines as to what specifically can be accomplished in the amount of time we have during tech classes.

I can’t wait to share their finished posters in the next few weeks and wish them the best of luck in the Aspire Awards!

Wednesday, March 14, 2012

Creating nameplates with 7th grade students


Following the introduction of Photoshop, 7th grade students are prepared to create a basic multi-layered image using the tools they’ve already seen as well as a few additional tools.  The purpose of the image is to use as an account profile picture on our school’s social network, Edmodo.  Students are represented by this picture (and their name) each time they write a new post or reply to another post.

Students first must create a new blank image file in Photoshop.  As long as the image is square, it will work, but I generally have students start with an image 500 pixels wide by 500 pixels tall.  The background should be “Transparent” and the resolution will work fine at 72 pixels per inch, which is generally the default choice.

Once in the blank file, I have students create a new layer on top of the bottom transparent background.  I also re-emphasize what I had told them before, that for every new tool or color change, they should make a new layer first.  The next step is to lay down a full color layer, by either using the paint bucket or gradient tool.  I quickly show them how the gradient tool works (pretty similar to the paint bucket but with a blend of colors rather than only one), and then move on to the brush.

Here’s a very valuable tip for anyone setting up Photoshop for student use, download and install as many different brush styles as you’d like at Brusheezy.  The site is entirely free and there are countless high-quality brush styles available there.  Students could peruse Brusheezy on their own, but I found in past lessons that it ended up taking up most of their work time, and also the brush files can be rather large so it can put a strain on your network all at once.  So I recommend setting up a nice selection of brushes before students ever sit down at Photoshop the very first time, clear and simple installation instructions can be found over at Brusheezy.

Using the wide variety of brush styles, colors, and sizes, students then create a nameplate design that they feel is suited to represent them online.  The brushes themselves look more like a stamp when seen at first, but in Photoshop they function just like any other brush style.  This step with the brushes has historically been highly enjoyed by my students as there is an endless supply of options to choose from.  Often students end up creating a couple different versions and then ask classmates to help them decide before they start designing the text of their name.

The final step of the nameplate creation process is adding a name to the nameplate.  This is completed with the text tool in Photoshop.  Similar to the brushes, I suggest a visit to FontSpace and downloading a few extra appealing fonts.  At the time of posting, they have nearly 17,000 free fonts to download.  There has to be at least a few desirable fonts for anyone in that batch!  Here are all of the separate layers for one student’s nameplate creation:


After the nameplate is complete, students use Photoshop’s “Save for Web” feature (found in the File menu) to reduce the size of the file and save it as a .JPG in order to upload it to their account profile.  Here are some more examples created by my students (with the names changed):

Tuesday, March 6, 2012

Introducing Photoshop to 7th Grade Students


One of my favorite instructional activities is introducing students to the world of visual manipulation in Adobe Photoshop. In the case of my 7th grade students, I am introducing them to Photoshop Elements, which is a lighter version of the full Photoshop when it comes to pricing and features. If you’re interested in this process but would prefer a free alternative to Photoshop or Photoshop Elements for Mac or Windows, see GIMP or GimpShop. For my purposes, the Elements version of Photoshop has all of the features I want to use with my students.

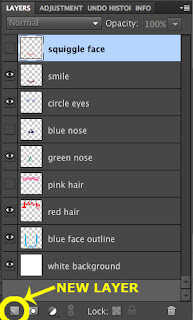
In my opinion the most complex hurdle to cross with students, or anyone for that matter, new to an advanced graphic editor like Photoshop is image layers. I find the easiest way to model exactly how layers work is with good old-fashioned overhead transparency paper. I take a small stack of transparencies and create a simple drawing of a face, but each element of the face is drawn on a separate sheet:

Using those transparencies, I can demonstrate that by manipulating the sheets or layers, it is easy to make a modification to a specific part of an image without affecting the other elements. This is regardless of what order the actions were completed, versus using the "Undo" command, which will only let you go back, step-by-step, in order. I emphasize to my students repeatedly that for every major change they make to an image, they need to make sure each change has its own layer. Here is a short video to demonstrate the layers:


Certainly layers are valuable for more reasons than just an advanced “undo” system, but I think this is an excellent entry point for new Photoshop users. After discussing the layers, we can move on to some of the tools in Photoshop that will feel quite familiar to anyone who has ever used any kind of painting software, the brush and the paint bucket. I demonstrate a few different ways to change the color of your current tool and also how to manipulate the brush size and brush style. Here is a video explaining the brush and paint bucket:


The final step is to show how to add a new layer to an image, by clicking the “New Layer” button in the Layers panel (see image right), or CMD+SHFT+N on Mac and CNTRL+SHFT+N on Windows. It’s time for students to explore these tools, but I offer one last reminder before students begin, that with each change to a tool, make a new layer!

In the next post, I will explain how to use these introductory tools and a few others to create student nameplates that could serve as account profile images for the school social network.