Pages

Showing posts with label Desktop. Show all posts

Wednesday, June 5, 2013

A Trip to the Printer


Recently, my 7th grade Adobe Youth Voices students and myself were incredibly humbled and fortunate to be invited by Chicago photographer John Batdorff to his gallery and printing space.  John volunteered his professional expertise and equipment (not to mention his time!) to create high-quality prints of the posters my students had created this past year in tech class.


Below are a few of these amazing graphic design creations.  You can see all eleven of the posters here or read about our creative process in a previous post here.


John gave us a demonstration and explanation of his printing process as he prepared their prints for his equipment.  My students buzzed him with questions about the printing and his amazing photography prints displayed in and around his gallery.  They were fascinated to hear about his world travels with his camera as well as the various photography books he has authored.


The prints turned out truly fantastic, beyond what my students or even myself had honestly hoped for.  The experience gave my students a peek into the world of a professional photographer.  They were able to see a professional artist and author speak about his craft and his passion.  The impression left was strong and I certainly recognize the need and value of connecting my students with professionals in the fields I am instructing them in, particularly with my middle school students with whom I cover a variety of media arts topics.


After the prints were complete and framed, they travelled along with my students a week later to an event showcasing Adobe Youth Voices student work from around Chicago.  You can watch a short, 90-second, film of the event below.

Thursday, April 11, 2013

Slow Jams: Familiar Tools, Innovative Ideas


Estimated time according to Read-O-Meter: 2m42s

© David Lenker
All, or at least nearly all, acts of creativity that stand out as culturally or personally esteemed forms of expression are a result of an artist using familiar tools in innovative ways.  This seems to be particularly true of computer/tablet/electronic creations.  Regarding media on the web or that you might see at a conference, typically it is far too easy to pick out the tools used to create the media.  An iMovie title, a Keynote transition, a Powerpoint template (ack!), an Animoto slideshow, an After Effects effect… When you see commonly used tools being used in familiar ways, the result is almost always formulaic.

The memorable standout creations are the ones where you have to stop and say, “Wow, how’d they do that?

This very same thing happens with my students of all ages, from 5 to 14 years old.  It could be a 2nd grader discovering a new font, an 8th grader creating a painting with a new combination of brushes and effects in Photoshop, or a 3rd grader creating a complex animated story in Stykz - - news of an innovative creation travels incredibly quick around the classroom and inspires all who are witness.

GarageBand for Mac OS
Recently I had a wonderful occurrence of this sort of innovative discovery spread amongst one of my 4th grade classes while using GarageBand.  A student used a Loops project to create a song and slow the entire thing down by drastically reducing the tempo in the Project menu (see image below).  It is a very simple change to make, but this one minor change had a drastic effect on the end result.  She was incredibly excited with it when it was complete and invited me over to listen.  Being someone who has heard hundreds, probably thousands, of student-created renditions with the same batch of 300-400 loops, I too became incredibly excited by an entirely new sound.

She exported the song and I copied it to my desktop (with speakers and sub-woofer), and as students were straightening up before leaving I put the song on – without introduction.  One student asked, “Who is this?” as if it was a song from the radio or iPod while most of the rest of the room broke out into dance.  If you’ve never seen a room of 10 year-olds dancing in a computer lab to a GarageBand tune titled “Slow Beat Rock”, you are definitely missing out.

Changing the tempo in GarageBand

As the song finished and they really wanted to know where it came from, I informed them of the artist behind the creation, and instantly the reaction directed at the student was, “Wow, how’d you do that?!”  For the subsequent technology class with that group of 4th graders, I had the student-artist behind the creation teach the class how to slow down, or speed up, their songs in GarageBand.  One of the most valuable things I’ve learned over a few years of teaching is that the most effective teachers in the room are the students themselves.  This occurrence strongly re-enforced that idea for me personally.  Below I’ve shared a few slow jams from that class, of course preceded at the top with the original slow jam that inspired the whole group.  Enjoy!

The original innovation, "Slow Beat Rock"


Slow Beat Rock Inspired #1


Slow Beat Rock Inspired #2

Tuesday, April 2, 2013

Students and their Evolving Search for Information


Estimated time according to Read-O-Meter: 2m22s

Recently I introduced first grade students to the online Encyclopedia Britannica as a way to locate information using the computer.  One part of starting this introduction, before ever mentioning the computer, is me asking the group, "Imagine that your teacher asked you find some information about dinosaurs, where would you look to find that information?"

The four individual responses from the group were:
  • "I'd search on the computer."
  • "I would type in 'dinosaurs' in the corner of the Safari."
  • "I'd Google it."
  • "I'd look it up on the iPad."

This was a first in my time as a tech teacher, that six and seven year-olds' first inclination to locate information at school was to simply Google the topic.  In the past, students have always first suggested books as the place to go, but clearly that has changed.  This is certainly not too surprising, as each new year our students are coming in more and more 'connected' via a slew of mobile devices at home, and that change is reflected in their school experience since they have been using iPads and having tech instruction since the first week of Kindergarten.

Search results for 'dinosaurs' on Britannica

After some demonstration of Britannica and a lot of exploration by the students, one student said to me, "I like these pictures and that it will read to me, but I think it's easier to just Google it."  I told the student that easier does not always mean better, but of course the answer is not that simple.  As my students continue to grow with their investigations and inquiries throughout this school year and the years to come, it will be a great benefit to know a variety of online sources of information - Google and Britannica included.

Part of me wants to immediately meet the students with their habits they have already formed in their personal lives, but I know it’s not entirely about that, but instead guiding them towards practices that fit the need and that provide the highest quality results.  In the perfect situation, the information literacy instruction would be powerful and valuable enough to resonate with students when they are outside of the classroom.  For that to happen, they have to see an authentic benefit during their classroom experience and not just think, “at school we have to suffer through Britannica research, but at home I can just Google it.”

Search results for 'dinosaurs' on Google

In this information literacy lesson with first graders concerning Britannica, I don't think I achieved the sort of resonation that will spill into their personal lives just yet.  But now the door is open to a conversation where we can consider together the differences between sources, authors, websites and other online resources.  It will no doubt be a lengthy and continually changing journey, luckily I have always found my primary grade students to be incredibly curious and enthralled with investigation and discovery.

Tuesday, March 26, 2013

Exploring with Google Earth through Children and their Toys


Estimated reading time according to Read-O-Meter: 2m36s

A few weeks ago I visited an amazing collection of photographs recommended by Jennie Magiera on Twitter.  The photographs were aesthetically stimulating and also provided an incredible amount of insight into the lives and experiences of others around the world from a variety of diverse locations.  Soon after that, Jennie wrote a blog post about sharing the images with her students and the subsequent conversation had on Schoology.

I was inspired myself and made plans to share the photos with my 4th graders the next day.  On a whim, I reached out to Jennie and we made plans to connect our students in a Google Hangout video chat to share our reflections together.  My students were extremely interested in the photographs and could hardly contain their excitement during our video chat.

So what are these photographs?

© Gabriele Galimberti
Italian photographer Gabriele Galimberti traveled around the world for 18 months and photographed children with their favorite toys.  He titled the series, "Toy Stories".  There are 34 different children (and locations) from five different continents.  The photographs not only give insight into what children around the world play with, but also something of the children themselves as you see the child in their play space.  Visit his site and see his Toy Stories collection.

After the first lesson, so many students wanted to know where these places were that they were seeing, so I went to Google Earth for help.  Following the tutorial videos from Google, I was able to create a .KMZ file with the images and placemarks embedded in the file (click here to download the .KMZ file, then open it in Google Earth).  When I saw my other 4th grade class the next week, the experience was dramatically different as they could not only browse through only the images, but they could browse the globe in Google Earth and click on the camera icon to see a child with their toys from that place.

Browsing the images in Google Earth
This allowed for two different conversations for my students, the images on their own versus the images on the map.  It was easy when using the map to compare and comment on images from the same region of the world.  Students had a variety of insights and reflections from taking in the images.  Most were surprised that children everywhere had toys like their own.  Many had a strong reaction to the variety of play spaces shown with each child.  The most talked about photographs by far were the few that show children surrounded with toy guns as their favorites.

I did the activity with all of my 4th and 5th grade classrooms and tried a few different methods for an accompanying online conversation:  Edmodo, TodaysMeet and Kidblog.  Each method had it’s own pluses and minuses, and in all honesty the conversations that happened verbally with neighbors were more intriguing as it was everyone’s sudden reaction rather than a planned out written thought.  But the online record provided an opportunity to hear from everyone for both myself as teacher and for all the other students.

Edmodo conversation about Toy Stories

TodaysMeet conversation about Toy Stories

Kidblog conversation about Toy Stories

Sunday, March 17, 2013

Purposeful graphic design with 7th graders


Estimated reading time according to Read-O-Meter: 3m19s

Finished poster painted in Photoshop by a 7th grade student

This year for Adobe Youth Voices (AYV) with my 50 seventh grade students I have focused a lot of technology instruction on Photoshop and a few relevant graphic design techniques using that software.  This was a very lengthy process for me and my students, but I believe they gained a lot valuable technical and design knowledge while I learned many lessons in project management for this number of students.

After a handful of technical lessons with the software, we dug into the AYV program by looking at successful projects from past years.  A successful AYV project is one that has a clear message, an intended audience, expresses youth voice, and showcases creativity and innovation with the software.

View some of last year's award winners

Next I wanted to help students find an issue or cause that they were particularly concerned with.  For some students, this is simple and apparent while others benefit from guidance and suggestions.  I had students do some private free writing and then go through and highlight words or thoughts that stood out to them as important.  Students then filled out an anonymous Google Form where I asked them three questions:

  • What topics are you concerned about in the world?
  • What are you passionate about?
  • What are you worried about or what pressures are you facing?

Having that questionnaire be anonymous greatly helped me discover what themes or trends they were really engaged with; and three trends emerged:  friends/cliques, bullying, and getting into their chosen high school.  As a specials teacher, I only see my students one time each week and it is challenging to develop the kind of trust needed to openly speak with ALL students about their personal life concerns – so an anonymous Google Form was extremely helpful.

After students decided a topic, they began planning the design for an 11”x17” poster on their chosen message.  Some students worked purely with brushes and text to create an original design and message, some found Creative Commons-licensed images and manipulated them in Photoshop to remix as their own, and some took original photographs to use in the creation of their poster.

A Creative-Commons photograph remixed in Photoshop by a 7th grade student

After a few classes of working with images, I showed them Karen Kavett videos about typography to get them thinking deeper about the typefaces they ultimately choose.  At the end of every class students shared in small table groups their creations and changes in order to give and receive feedback.  It took a bit longer than I had planned, but all students eventually wrapped up the design and creation of their original poster.

After everyone was finished, myself and another teacher selected 12 posters from the group of 50 that we thought should be submitted to this year’s Aspire Awards.  Those posters, though “turned in”, now needed a lot of fixing of details both big and small, as well as written artist statements.  That is where we currently are in the process, I am working with 12 students after school to refine and write.

Revisions of a student's poster (original at top, finished at bottom)

I learned valuable lessons from this experience that I will definitely apply to similar situations in the future.  The first is that when doing 50 different projects that are artistic and technical, it is vital to include peer feedback consistently throughout the process.  This saved time and students became skillful at it once we began practicing a quick critique at the end of class.  The second is that although it was wonderful to tell students they could create anything they wanted, in practice it ruined some students’ ideas from the start.  I should have seen that some ideas were too ambitious for the time we have and in the future I will give more guidelines as to what specifically can be accomplished in the amount of time we have during tech classes.

I can’t wait to share their finished posters in the next few weeks and wish them the best of luck in the Aspire Awards!

Sunday, March 3, 2013

Sharing Student Work

It has been many months since I've taken the time to sit down and write a blog post, but the ICE Conference came and went (too quickly!) and has re-energized my thirst for both absorbing and sharing.  In particular, I attended a spectacular breakout session led by Pernille Ripp all about blogging - - students blogging, teachers blogging, personal blogging.  It was a heartfelt call to action and I know I wasn't the only one who left her sessions inspired.

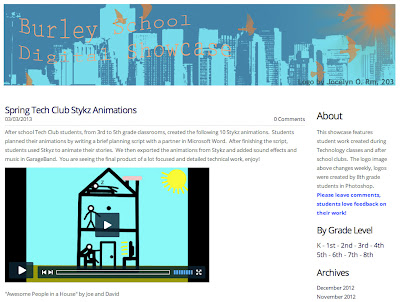
Although I have not shared anything new here since the start of school year, I have been busily updating and sharing a Digital Showcase which features my students' work from Tech Classes and after school Tech Clubs. Collecting student work has been incredibly easy for me ever since I realized I could search and copy from all 32 computers in my classroom at the same time using Remote Desktop.

Burley School Digital Showcase

I added a link to the Burley School Digital Showcase in the right sidebar, please visit and feel free to provide feedback to my students!  Though I am the one posting the work, they frequently look at the site and of course I direct them there as soon as their work receives feedback.  I just added a fresh round of Stykz animation movies with full soundtracks created by my 3rd-5th grade after school Tech Club - check it out!

Monday, July 30, 2012

Digital Animation with Stykz


There is no shortage of options for introducing digital animation to students, but hands down the favorite among my students, from 2nd to 8th grade, is Stykz. Stykz is created by Sons of Thunder Software, is completely free, and is available for Mac OS X or Windows.

Stykz is reminiscent of flip book drawings that most students are familiar with, where a stick figure is drawn on one page and then moves slightly on the next and so on. It seems like this familiarity with pencil and paper flip books is part of the reason students are so comfortable with the interface of what can be a fairly complex animation tool.


You begin a default Stykz document with a white background and a single stick figure. The red dots are pivot points that can bend, stretch and distort. The yellow point is the anchor of the figure, allowing you to move the entire figure around.


When you make a new frame, most easily done by pressing Return/Enter, and then move your character, Stykz provides a ghost image of where everything was placed in the previous frame. This allows you to create smooth animations by only making small adjustments to each frame.

Hopefully, my explanation does not sound complicated, because the software truly is not. I have briefly introduced Stykz to 2nd, 3rd and 4th graders in an after school club, and the students quickly pick up on a variety of features and tricks through experimentation and sharing with their neighbors.

If you want to add more characters to your Stykz library, you can create them, or you can visit Droidz and download figures created by other Stykz users. A word of caution about Droidz though, I wouldn’t send my students there – many of the figures involve weapons and violence. Instead, I go through the site occasionally looking for primary grade-safe figures, and add them to all of the computers in my classroom.

As with any software tool, there are endless YouTube tutorials on learning features beyond the basics. Here are a few I recommend:

Take a look below at a Stykz compilation from my students this past year:

Tuesday, July 3, 2012

Aspire Awards Medal Winners!


Back in April, five of my (now graduated) 8th grade students created a stop-motion animation film for Adobe Youth Voices titled "Gone".  The film was entered into the 2012 Aspire Awards Film/Media Festival.  Recently we found out the film was awarded the silver medal in the narrative category by panel of film professionals, quite an honor!

The students chose the topic of child soldiers in Africa for the piece.  They collaboratively wrote the script, created storyboards, created the construction paper artwork, photographed and directed the stop-motion animation, edited the piece in Adobe Premiere Elements, and produced the soundtrack in Garageband.  They amazed me with their creativity and work ethic throughout the process, and in particular I was blown away with the soundtrack they created, a very professional end result in my opinion.


Here is the artist statement written by the students:

"Thousands of children in Africa are abducted into war every year by corrupt soldier militias. These child soldiers are placed into extremely violent situations and girls are frequently abused and forced into unimaginably heinous acts. We felt we could most greatly help children forced into warfare by publicizing a story that has been repeated throughout the world far too many times. The intention for this piece is to educate other teenage children like ourselves as well as adults who may be unaware of these atrocities."

If you have not seen it, I hope you'll watch it now (below) and enjoy!

Saturday, June 30, 2012

Celebrating the school year with animation!

Another school year has come to a close and another group of amazing 8th grade students have moved onward to high school.  In the months leading up to their graduation, these students absolutely amazed me with a variety of high-quality animation projects.  I share these with you now (don't forget you can toggle them to full-screen), enjoy!


The animations included in the compilation above were created throughout the school year using a variety of methods and tools (stop-motion photography, Stykz, Keynote, and Animation-ish).  I definitely plan to share lessons and instructional activities using these tools in the future, my students really enjoy creating with each of them.


The second animation (above) is purely stop-motion photography.  This project took a lot of time, effort and planning by the students.  Overall, about 2,000 digital photographs were used to create the 3-minute tour of our school building.  As the students created the tour section by section, we reviewed the new additions before each subsequent photographing session.  Those reviews provided the next group of students with inspiration and ideas to continue finding creative ways to conduct the tour.

The beauty of working on projects like this is that I will be able to share these fine examples with the next year of 8th grade students.  I have no doubt they will build on the ideas and continue to be innovative youth media artists.

Saturday, March 24, 2012

Non-Fiction Features in Digital Painting


At the beginning of the school year, I introduce first graders to the various ways of interacting with the mouse and keyboard by using simple paint software.  We currently use Appleworks in our Media Center, but there are many updated and free paint programs (Mac or Windows) that would work just as well.

Simply by using the paintbrush, drawing shapes, moving objects, and adding words students are developing a variety of technical skills.  Some of the important computer interface skills younger students develop with painting software include clicking, clicking and dragging, double-clicking, and typing with the keyboard.  Once students become proficient with the physical skills, it’s time to integrate these new technical skills with relevant classroom content.


Throughout the year, 1st graders at my school learn about features of written non-fiction pieces with their classroom teacher (on Twitter and her blog).  A few specific non-fiction elements that translate very well into painting software are diagrams with labels, attaching lines, and titles.

There are a few ways to go about the creation of the image part of the diagram.  I typically have students start out by making a diagram out of clip art so they can focus on adding text labels, lines connecting those labels to the appropriate areas, and titles with appropriate size and typeface.  

After students have experience making a diagram out of clip art, students are ready to make a diagram with an image they’ve created using the painting and drawing tools.  I want them all to have at least 3 separate labels, but encourage them to add as many labels as they want.  I am always incredibly impressed with their finished products!


Wednesday, March 14, 2012

Creating nameplates with 7th grade students


Following the introduction of Photoshop, 7th grade students are prepared to create a basic multi-layered image using the tools they’ve already seen as well as a few additional tools.  The purpose of the image is to use as an account profile picture on our school’s social network, Edmodo.  Students are represented by this picture (and their name) each time they write a new post or reply to another post.

Students first must create a new blank image file in Photoshop.  As long as the image is square, it will work, but I generally have students start with an image 500 pixels wide by 500 pixels tall.  The background should be “Transparent” and the resolution will work fine at 72 pixels per inch, which is generally the default choice.

Once in the blank file, I have students create a new layer on top of the bottom transparent background.  I also re-emphasize what I had told them before, that for every new tool or color change, they should make a new layer first.  The next step is to lay down a full color layer, by either using the paint bucket or gradient tool.  I quickly show them how the gradient tool works (pretty similar to the paint bucket but with a blend of colors rather than only one), and then move on to the brush.

Here’s a very valuable tip for anyone setting up Photoshop for student use, download and install as many different brush styles as you’d like at Brusheezy.  The site is entirely free and there are countless high-quality brush styles available there.  Students could peruse Brusheezy on their own, but I found in past lessons that it ended up taking up most of their work time, and also the brush files can be rather large so it can put a strain on your network all at once.  So I recommend setting up a nice selection of brushes before students ever sit down at Photoshop the very first time, clear and simple installation instructions can be found over at Brusheezy.

Using the wide variety of brush styles, colors, and sizes, students then create a nameplate design that they feel is suited to represent them online.  The brushes themselves look more like a stamp when seen at first, but in Photoshop they function just like any other brush style.  This step with the brushes has historically been highly enjoyed by my students as there is an endless supply of options to choose from.  Often students end up creating a couple different versions and then ask classmates to help them decide before they start designing the text of their name.

The final step of the nameplate creation process is adding a name to the nameplate.  This is completed with the text tool in Photoshop.  Similar to the brushes, I suggest a visit to FontSpace and downloading a few extra appealing fonts.  At the time of posting, they have nearly 17,000 free fonts to download.  There has to be at least a few desirable fonts for anyone in that batch!  Here are all of the separate layers for one student’s nameplate creation:


After the nameplate is complete, students use Photoshop’s “Save for Web” feature (found in the File menu) to reduce the size of the file and save it as a .JPG in order to upload it to their account profile.  Here are some more examples created by my students (with the names changed):

Tuesday, March 6, 2012

Introducing Photoshop to 7th Grade Students


One of my favorite instructional activities is introducing students to the world of visual manipulation in Adobe Photoshop. In the case of my 7th grade students, I am introducing them to Photoshop Elements, which is a lighter version of the full Photoshop when it comes to pricing and features. If you’re interested in this process but would prefer a free alternative to Photoshop or Photoshop Elements for Mac or Windows, see GIMP or GimpShop. For my purposes, the Elements version of Photoshop has all of the features I want to use with my students.

In my opinion the most complex hurdle to cross with students, or anyone for that matter, new to an advanced graphic editor like Photoshop is image layers. I find the easiest way to model exactly how layers work is with good old-fashioned overhead transparency paper. I take a small stack of transparencies and create a simple drawing of a face, but each element of the face is drawn on a separate sheet:

Using those transparencies, I can demonstrate that by manipulating the sheets or layers, it is easy to make a modification to a specific part of an image without affecting the other elements. This is regardless of what order the actions were completed, versus using the "Undo" command, which will only let you go back, step-by-step, in order. I emphasize to my students repeatedly that for every major change they make to an image, they need to make sure each change has its own layer. Here is a short video to demonstrate the layers:


Certainly layers are valuable for more reasons than just an advanced “undo” system, but I think this is an excellent entry point for new Photoshop users. After discussing the layers, we can move on to some of the tools in Photoshop that will feel quite familiar to anyone who has ever used any kind of painting software, the brush and the paint bucket. I demonstrate a few different ways to change the color of your current tool and also how to manipulate the brush size and brush style. Here is a video explaining the brush and paint bucket:


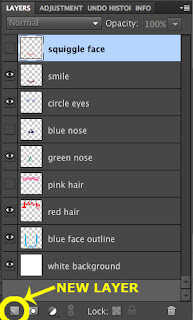
The final step is to show how to add a new layer to an image, by clicking the “New Layer” button in the Layers panel (see image right), or CMD+SHFT+N on Mac and CNTRL+SHFT+N on Windows. It’s time for students to explore these tools, but I offer one last reminder before students begin, that with each change to a tool, make a new layer!

In the next post, I will explain how to use these introductory tools and a few others to create student nameplates that could serve as account profile images for the school social network.